Version control#
Version control is managing changes to your analysis over time. In this chapter, we primarily discuss the benefits of using the Git version control system.
Pre-requisites
To get the most benefit from this section, you should have a basic understanding of how to use Git. Many of the examples used in this section refer to the command-line interface for Git, so general command-line knowledge may also help.
You can find links to relevant training in the Learning resources section of the book.
Keep an audit trail of changes#
As we discussed in Principles, an audit trail is essential for assuring quality analysis. It’s important for us to be able to answer the following questions about our analysis:
What changes have been made to our project?
When were those changes made?
Why were those changes made?
Who made those changes?
Version control software, like Git, records the answers to these questions throughout the development of a project. We can detail our development decisions alongside changes, using commit messages and Pull or Merge Requests. In turn, this keeps our analysis workspace clean of commented-out old code and numerous files containing previous versions.
Fig. 6 Documents, from xkcd. This work is licensed under a Creative Commons Attribution-NonCommercial 2.5 License.#
Effective use of version control helps us to identify which changes have negatively impacted our work and remove them. Furthermore, a detailed audit trail allows us to refer to specific versions of our code that have been used to produce outputs, which is important for reproducing our analysis.
Git is invaluable when recording and combining changes from multiple developers, as merging allows us to resolve conflicts between overlapping changes. A remote Git repository maintains a single source of truth, even when multiple individuals are working on a project. Additionally, version control platforms, like GitHub and GitLab, can make it easier to track and review ongoing work. This avoids duplication of effort and keeps review embedded in the development workflow.
Include code and documentation in version control#
Ideally, you should include all code and documentation that is required to understand and run your analysis.
This may include:
Project documentation including readme and contribution guidance.
Packaged functions and code documentation.
Unit tests.
Dummy data and example configuration files.
User documentation such as desk notes and installation guidance.
Exclude sensitive information from version control#
In a public repository, you may need to omit confidential or sensitive aspects of the project.
Caution
You should never include the following in your code repository:
Passwords, credentials or keys.
Real configuration files.
Code that contains sensitive information.
for example, code that describes a method for fraud detection.
or code that contains references to personally identifiable data.
or code that might compromise security protocols.
Data, except for small example datasets.
See Avoid committing sensitive information to Git repositories for details on how to mitigate the risk of including sensitive information in a Git repository.
It is again worth stressing the importance of not committing sensitive, unpublished, or disclosive data to your Git history. If you would like to include an example for end-users, a minimal dummy dataset can be committed to the repository. When creating realistic dummy data, care should be taken not to disclose sensitive features of the true data such as distributions and trends. Dummy data should always be carefully peer reviewed before being added to a repository.
Using Git for version control#
Git is a distributed version control system. This means that all users have access to a complete and self-contained history of changes to a given project. The software can be used to record local changes, with the option of then synchronising these changes with a central, remote repository. Remote repositories are typically hosted on a platform like GitHub or GitLab.
The following sections describe useful concepts for using Git to version control your analysis. We use examples of Git commands throughout, but do not provide detailed descriptions of Git usage. If you are not familiar with using command line tools, or Git specifically, you should first look into introductory training.
Write short and informative commits#
Commits are collections of changes to one or more files in a repository.
Every commit is attributed to the author of the changes, providing an audit trail.
Each commit has a unique hash - or identifier - associated with it, which has a long (e.g., 121b5b4f18231e4ee32c9c61f6754429f9572743) and short version (e.g., 121b5b4).
These hashes allow us to refer to specific changes, but each commit also has an associated message that is used to describe the changes.
Note
When adding changes to be included in a commit, you should preferentially add individual files or directories.
For example, using git add src/my_file.txt rather than a catch-all like git add ..
This specificity ensures that only intended changes are included, reducing the likelihood of including unrelated changes or files that should not be versioned
(when they are not included in .gitignore).
Using git status after adding changes can help to confirm that only the desired changes are included.
Most commit messages are short and informative, but in some cases you may want to provide more detail. Common standards follow this model commit message from “A note about Git commit messages”:
Capitalized, short (50 chars or less) summary

More detailed explanatory text, if necessary. Wrap it to about 72
characters or so. In some contexts, the first line is treated as the
subject of an email and the rest of the text as the body. The blank
line separating the summary from the body is critical (unless you omit
the body entirely); tools like rebase can get confused if you run the
two together.

Write your commit message in the imperative: "Fix bug" and not "Fixed bug"
or "Fixes bug". This convention matches up with commit messages generated
by commands like git merge and git revert.

Further paragraphs come after blank lines.

- Bullet points are okay, too

- Typically a hyphen or asterisk is used for the bullet, followed by a
  single space, with blank lines in between, but conventions vary here

- Use a hanging indent
A concise summary of your change is usually sufficient, but remember that it is these commit messages that will be used in the future to understand what changes have been made to your project. You might rely on these to identify where an error has been introduced, so it is important that you write these messages clearly and informatively.
How often you commit when working on a project should depend on what benefit you would like to get from versioning your work. When reviewing code that has been version controlled, the commit history provides a chronological summary of the changes that have been made to a project. To make this audit trail useful, commits should be made whenever a discrete unit of work has been completed. When useful commit messages have been used to describe these units of work, it is easier for others to understand steps taken to develop the analysis to its current state.
You should also make commits whenever you have made changes that you might wish to revisit or undo.
As Git allows us to easily revert changes by referring to a commit’s hash,
you should try to ensure that each commit only contains changes to single aspect of your analysis.
Consider a commit that includes changes to several files.
We discover that one change in this commit has created a bug in our analysis code.
We can revert the commit to remove the bug, but this also removes the other changes that were made in the same commit.
As such, we’ll need to invest more effort to work out which change causes the bug and selectively undo that change.
Use branching appropriately#
Branches are independent copies of a project’s history, copied from a parent branch at a specific point in its history. You typically create a new branch to make a change to your code, which might be building a new feature or fixing a bug in your analysis. You can create multiple branches from a single parent branch when multiple changes are being worked on independently. This is especially useful when multiple analysts are working collaboratively and are making changes in parallel.
Once changes have been implemented and sufficiently quality assured (think documentation and testing),
the branch containing the changes can be merged onto another branch.
The target branch for this merging is typically the parent branch, which the branch was branched from.
You should eventually merge complete changes onto the main branch, which is the public-facing branch that is ready for use.
You must resolve any overlapping or ‘conflicting’ changes between the current and target branches during merging.
It is important to note that your approach to branching within a project
should be proportional to number of collaborators and the complexity of the development work.
For example, if working alone on a project you might only be working a single development branch at any moment in time,
or might choose to track all changes on a single main branch.
The main or master branch is the default highest level branch in a Git repository.

Fig. 7 Commits along a single “main” Git branch.#
More complex projects may warrant using branching.
When using branches, the main branch should be considered as the most ‘stable’ branch in the repository -
meaning that the code on this branch builds successfully and executes as expected.
When you make changes to code, they may initially be less stable or reliable.
Therefore, you should make these changes on a new branch so that the working code on the main branch is unaffected.
As the changes to the code are refined, it becomes safer to merge these changes onto a higher level branch such as main.
For example, when the code has been reviewed and suitably tested.
You should aim to only merge onto a more stable branch when you don’t expect it to break the working code on the target branch.

Fig. 8 Working on changes on a single feature branch.#
Here we show a single feature branch being created from the main branch.
Changes are initially quite experimental, but are refined over a few commits.
Finally, we merge the complete, working feature back onto the main branch.
Many small scale projects iteratively work on individual feature or development branches in this way. The GitHub flow branching strategy uses this approach in combination with Pull Requests, to incorporate peer review into the development workflow.

Fig. 9 Iteratively working on a develop branch.#
We can create multiple branches from our main branch at any point.
We might do this when multiple features are being developed in parallel, or perhaps when multiple analysts wish to make changes to the same piece of code independently.

Fig. 10 Working on multiple parallel branches.#
Here we create two feature branches from main.
Work on each feature is carried out independently of the other feature and can be merged onto main once it is complete.
If changes from separate branches affect the same files, merging these branches to main may lead to merge conflicts.
In these cases you should resolve the conflicts to keep your desired overall change.
Note
If you are able to break up your work into independent features that are not expected to affect the same files, you should do this. This helps to avoid conflicts in the merging process that need to be resolved manually.
In addition to having multiple branches from our main branch, we can also create deeper branches from our other branches.
You might create additional sub-branches when the development of a feature involves multiple sub-tasks,
or when a problem needs to be fixed during development of a feature.
Deeper branching usually reflects work that is less stable and more exploratory or experimental.

Fig. 11 Using deeper branching to manage sub-tasks.#
In this example, we have created a feature branch.
Early in development of the feature we want to fix a bug that has been created,
but this work can be carried out independently to the remaining development of the feature.
As such, we create another, deeper branch to carry out the bug fix.
Once we fixed the bug, we merge the bug-fix onto our feature branch. And finally, the finished feature can be merged back onto main.
The Git flow branching strategy describes an alternative to progressively merging our changes onto main.
Instead, development work is branched from a develop branch.
You only use merges from develop onto the main branch to release a new version of the code.
This approach can be useful when deploying code directly into production from the main branch.
However, analysts should use the most simple and beneficial approach to branching depending on their project.
Note
Although we have used very simple branch names in the examples above, it’s important that you use informative names for your branches in practice.
If using an issue tracker (e.g. GitHub Issues or Jira), it can be useful to include the issue number in branch names (e.g., #155-fix-index-aggregation).
This makes it easy to trace the branch back to the associated issue or task.
Otherwise, aim to use meaningful names that describe the feature or bug that the changes will be ed on.
Resolve merge conflicts#
Git is effective at merging different branches.
However, when the same file is edited in two different branches at the same time, this can lead to a merge conflict when you try to merge those branches.
When this happens, you will see a message telling you there is a merge conflict and which files are affected.
The file name will appear as branch-name|MERGING.
You can fix this by manually selecting which changes to keep.
If using the command line, you can also run git status to output the names of the affected files.
When merge conflicts happen, git will mark the clashes using this syntax:
Changes on the branch being merged
=======
The row of equals signs divides the old from the new. The contents in the first division are the changes in the current branch. Changes in the second division are from the new branch. You can choose to keep one, both, or neither. To resolve the merge conflict, you will need to make the necessary changes and delete the relevant symbols that git added to the text. Once you have resolved all conflicting text manually (there may be more than one), then you can add and commit the changes to resolve the merge conflicts.
Avoid merge conflicts whenever possible. Do this by avoiding editing the same files across different branches. If this is difficult to do, it may be that your scripts are too monolithic and should be modularised or split into multiple scripts.
Versioning large files#
Git stores compressed copies of all previous versions of each file when versioning your repository.
Despite the file compression, this means that versioning very large or binary files quickly increase the size of your repository’s history,
especially if there are multiple versions of them.
The size of your Git history determines how long it takes to clone or pull and push changes to and from your remote repository.
This includes when a continuous integration platform downloads your repo to run tests and other checks.
Therefore, storing large files in Git typically slows down your development workflow.
Git Large Files Storage (LFS) is a Git extension that allows you to version large files,
but without storing the files in your repository history.
Large files in your repository’s history are instead replaced with a small text-based pointer.
This pointer references versions of the actual files, which are stored in a separate part of your remote repository (e.g., GitHub or GitLab).
When you pull a repository including large files, only the current version of the file is retrieved from the remote server, rather than its whole history.
This reduces the size of your local repository and the time taken to push and pull changes.
Git-LFS integrates well with a normal Git workflow and can be used for specific files,
or even all files of a particular type within your repository.
Other tools, including git-annex can be used for a similar purpose.
Despite this support for large files, we recommend that remote Git repositories are not used to store data. Versioning of your data could instead be handled independently to your code; the version of your code should not be influenced directly by changes in the data and vice versa. You can achieve this separation using a tool like DVC, which allows you to specify where data versions are store (locally or on the cloud). Alternative, third party storage (e.g., cloud-based ‘buckets’ or databases) can provide easy data storage with varying levels of version control capability.
Tag new releases#
Regularly commiting changes using Git helps us to create a thorough audit trail of changes to our project.
However, there may be discrete points in the history of the project that we want to mark for easier future reference.
This is incredibly useful, as commit hashes like 121b5b4 serve as really poor identifiers for human users.
Git allows us to create “tags” to reference specific points in project’s history. These tags essentially act as an alias for a particular commit hash, so we can refer to it by an informative label. We might use tags to mark a particular model version in an analytical project or an important stage of our analysis. For example, we might tag code that has been used to generate a particular output so that it can easily be accessed to reproduce that output in future. If developing a package as part of your analysis, these tags are also commonly used to indicate new package versions.
By default, tags will reference the current position in history (i.e., the latest commit or HEAD).
An annotated tag might be created for a new model version like so:
git tag -a v0.2.7 -m "Model version 0.2.7"
git push origin v0.2.7
You can also retrospectively tag an older commit by providing that commit’s hash:
git tag -a v0.1.0 -m "Model version 0.1.0" 9fceb02
git push origin v0.1.0
Once tags have been created, these locations in the projects history can be easily recovered by either checking out:
git fetch --all
git checkout tags/v0.1.0 -b new_branch_name
or cloning the tag:
git clone https://github.com/<user>/<repo>.git --branch=v0.1.0
Avoid committing sensitive information to Git repositories#
Code itself is very rarely sensitive, so we should be open to sharing it. However, analysts may be required to use sensitive information in their analysis. This might be in the form of credentials, used to access a service, or data that contains personally identifiable information.
In these cases, we need to minimise the risk of inadvertently sharing this information with our code. This subsection suggests how you might mitigate this risk in your analysis.
You should ensure that passwords or credentials that are used in your code are stored in environment variables and are not written directly into code. This includes in the early stages of development, as your version control history will retain copies of these.
Automatically avoid committing unwanted files using .gitignore#
As mentioned above, you may not want to include all of the files associated with your project in a Git repository.
A .gitignore file allows you to exclude folders or files from being tracked by Git. Within this file, you provide a list of text patterns.
If a folder matches one of your .gitignore file patterns, none of the files or folders below that folder will be tracked.
If an individual file matches one of the patterns, this file will not be tracked.
Given this example .gitignore file:
secrets.yaml
sandpit/
*.csv
The first pattern tells Git to ignore any file with the exact name secrets.yaml.
The second will ignore all files within a folder named sandpit/.
Note that if there are multiple folders in the project named sandpit/, they will all be excluded.
You should make the pattern more specific if you want to exclude particular directories.
The third pattern will exclude all .csv files, regardless of which folder or sub-folder they are in.
Caution
Files that are already being tracked by Git will not be excluded when you add new patterns to your .gitignore file.
Ensure that you set up your .gitignore before adding files to be tracked in your repository.
Please see the Git documentation for .gitignore for more details.
While we may not want to share files containing credentials, configuration and data, it can be useful to provide dummy examples of these files. Demonstrating the format of these files can help others to reuse your code, without sharing sensitive information.
Exclude .Rdata and .Rhistory files#
R saves objects from your workspace (working environment) into an .RData file at the end of your session.
This can save time when reloading large objects into R, when returning to a project.
Depending on your settings, it may prompt you to ask if you would like to save them or it may do this automatically.
If you have read sensitive information into R during the session, this information may be saved to the .RData file.
As such, we must be careful not to include this information in commits to remote repositories.
Similarly, R stores a record of all commands executed in your session in a .Rhistory file.
If you have referenced sensitive information directly in your R commands, then this information will be written to the .Rhistory file.
We can exclude these files (via .gitignore) or prevent R from generating them to handle this.
If you do not use these files, it is safest not to generate them in the first place.
In Rstudio, you can disable writing of these files via Tools > Global options:
Under Workspace, select
NeverforSave workspace to .RData on exit:.Under History, deselect
Always save history.
Or to set these for a particular project you can include the following in your .Rproj file:
RestoreWorkspace: No
SaveWorkspace: No
AlwaysSaveHistory: No
Avoid saving data from Jupyter Notebooks#
Jupyter Notebooks save a copy of the data that is used to create cell outputs by default. For example, the data used to generate a chart, table or print a section of a dataframe. This can be useful for sharing your code outputs without others needing to re-execute the code cells.
If you work with sensitive datasets in notebooks, this means that your notebooks may store sensitive data to display cell outputs. You may be making sensitive data available to unauthorised individuals if these notebooks are subsequently shared in code repositories, .
It is not currently possible to prevent the notebooks from retaining cell outputs.
The best way to handle this situation is to clear the outputs from your notebooks before committing them to Git repositories.
You can do this from the notebook itself, by going to the menu Cell > All > Output > Clear and then saving your notebook.
Alternatively, you can do this from the command line by running this command with your notebook file path:
jupyter nbconvert --ClearOutputPreprocessor.enabled=True --inplace <notebook_file_path>
This approach is quite laborious and could easily be forgotten.
As such, we advise you to automate the cell clearing using Git filter as follows.
First, we tell Git to set an attribute on our notebook files by creating a .gitattributes file in the root of our repo:
*.ipynb filter=jupyternotebook
We can then define our cleaning instructions in a .gitconfig configuration file:
[filter "jupyternotebook"]
    clean = jupyter nbconvert --ClearOutputPreprocessor.enabled=True --inplace %f
    required
You can add this to your global .gitconfig or create a local .gitconfig file in the root of your repo.
If you create a new config in your repo, you must run the following in that repo:
git config --local include.path ../.gitconfig
This configuration will now run the notebook output cleaning command every time a change to an .ipynb file is added to your local repo.
You will need to then git add the file a second time to add the changes from the cleaning.
This should prevent notebook outputs from being included in commits to this repository.
If you adjust the filter at any point, you should run this command to apply the changes to existing files:
git add --renormalize .
This approach has been borrowed from this blog post by Yury Zhauniarovich.
Control access to code only when essential#
Remote version control platforms, like GitHub, have a visibility setting that represents whether the repo can be viewed publicly or only by owners of the project We find that some analytical teams choose to develop code in the open, as per guidance from the Government Service Manual. Others work in a private repositories, and then might either change to public or migrate to a fresh public repository to make the code open.
Caution
Access control should not be used instead of the good practices outlined above. Restricting access can help to limit the risk of releasing sensitive information, but correct use of version control tools avoids these issues.
On GitHub, Organizations provide an area for collating multiple repos that are associated with a particular team or department. Within Organizations, Teams can be also created to manage view and contribution permissions for specific projects within the Organization. External collaborators can also be added to projects to allow direct contribution from those outside of the Organization. Detailed setup and management of Organizations and Teams are described in the relevant section of the GitHub documentation.
Only Organization members and collaborators may make direct contributions to the code in the repo regardless of the visibility status of a repo,. Others can contribute by Forking and using Pull Requests.
Handle data breaches via Git#
If unauthorised individuals may access sensitive information through their accidental inclusion in a remote repository, this is a data breach. For example, pushing credentials or sensitive data to a remote public GitHub repository.
To handle a data breach, you should:
Firstly, prevent further access to the information.
Restrict access of the repository to only those who should have access to the information. For example, make a public repository private.
Remove the offending files from the commit history of the repository.
If credentials (passwords or keys) have been revealed, you should change these credentials.
Ask anyone that you know has access to the repository to delete their local copy and re-clone the cleaned remote repository.
Secondly, report the incident.
Record roughly how long the information was available for and the potential impact of releasing this information.
Inform the data owner of the breach.
Discuss the breach with the Data Protection Officer in your department. They should be able to advise you on the steps you should take as well, according to your departments data security policy.
If the breach includes pre-publication statistics, you must also report the breach to the Office for Statistics Regulation.
Warning
Deleting a sensitive file and committing this change is not sufficient. All previous versions of files are retained in a repository’s history, so sensitive parts of the file must be entirely removed from the history.
The Pro Git book section on rewriting history details methods for editing and deleting files from your repository’s commit history. Git has a built-in way to do this. If you are able to install them in your department, you may use one of the simpler alternatives, such as git-filter-repo (python) or BFG repo-cleaner tool (Java).
Using GitHub#
A number of version control platforms extend the functionality of Git to further improve collaborative working.
Here we describe some of the beneficial features supported by GitHub, the world’s leading software development platform. GitHub provides additional tools for better management of collaborative work. Many of these tools are also discussed in detail on the GitHub features page, but we will describe how they may be applied in analytical workflows here.
Use Git issues to plan and discuss development of your project#
Issues offer a method for requesting or recording tasks, including enhancements and bug fixes in a project. They act as a collaborative todo list which users and developers can easily contribute to. When combined with Project boards, the issues system works very similarly to other tools like Trello and Jira.
The basic elements of an issue are the:
Title and description, provided by the person that submitted the issue.
Labels that categorise the issue (e.g., enhancement or bug).
Comments section where the issue can be discussed.
Assigned developers that are working on resolving the issue.
Within an issue’s description and comments, you can reference other issues both within (e.g., #12) and between repos,
and tag individuals to notify them of your comments (@whatstheirface).
Similarly, you can link issues to specific changes that will be merged to resolve or help to solve the issue.
This makes them useful for discussing bugs and new features within a team.
When a GitHub repo is publicly visible, the issues are also open and can be contributed to by others, including users. Open source projects benefit from this transparency by providing users with a platform to highlight which changes to the project will be most beneficial for them. In turn, developers in the community can then address these issues to improve the project.
Analytical projects might use issues to plan and discuss the steps involved in developing the project. Collaborators might be tagged or assigned to the task where additional help is required. If your analysis code is widely useful, others that use your code may also suggest improvement and offer to contribute to the project via these issues.
Setting issue templates for your project can be an effective way of encouraging users and collaborators to use informative descriptions when creating issues. For example, a bug issue should include simple instructions to help maintainers reproduce the problem. Feature requests might include information on how the user expects the new feature to work and details what problem it will help them to overcome.
Use pull requests for reviewing changes#
Once changes have been implemented, perhaps to meet the requirements of an issue, Pull Requests (PRs) provide a useful interface for incorporating changes into the main project. We typically use PRs to merge a development branch (the source branch) onto a more stable branch in the main project (the target branch). The development branch here may be within the same repo, a Fork of this project, or even a completely separate project.
You should include the high level changes that have been made in the initial description of the PR, and you might point to any relevant issues that it resolves. You can link PRs to other issues and PRs, and should provide a coherent narrative of development work much like issues. You can use Keywords when linking an issue (e.g., ‘fixes #42’) to trigger the issue to close the PR is merged. You can assign contributors or tag them in discussion, which can be useful for requesting help or review of a group of changes.
Put checklists into your pull request comments. These come with check boxes that can be ticked. This is useful when breaking down tasks into smaller chunks. Use checklists to help the reviewer review all the relevant parts of the pull request when requesting a review. As a reviewer, use checklists to list changes needed before the pull request can be approved. The Government Digital Service have good examples of what this can look like.
Alongside the main “Conversation” view of a PR, the GitHub web interface also provides a useful overview of changes that are included in the PR. You’re able to view the list of individual commits that are included in the PR and, better still, you can view changes to each file in detail.
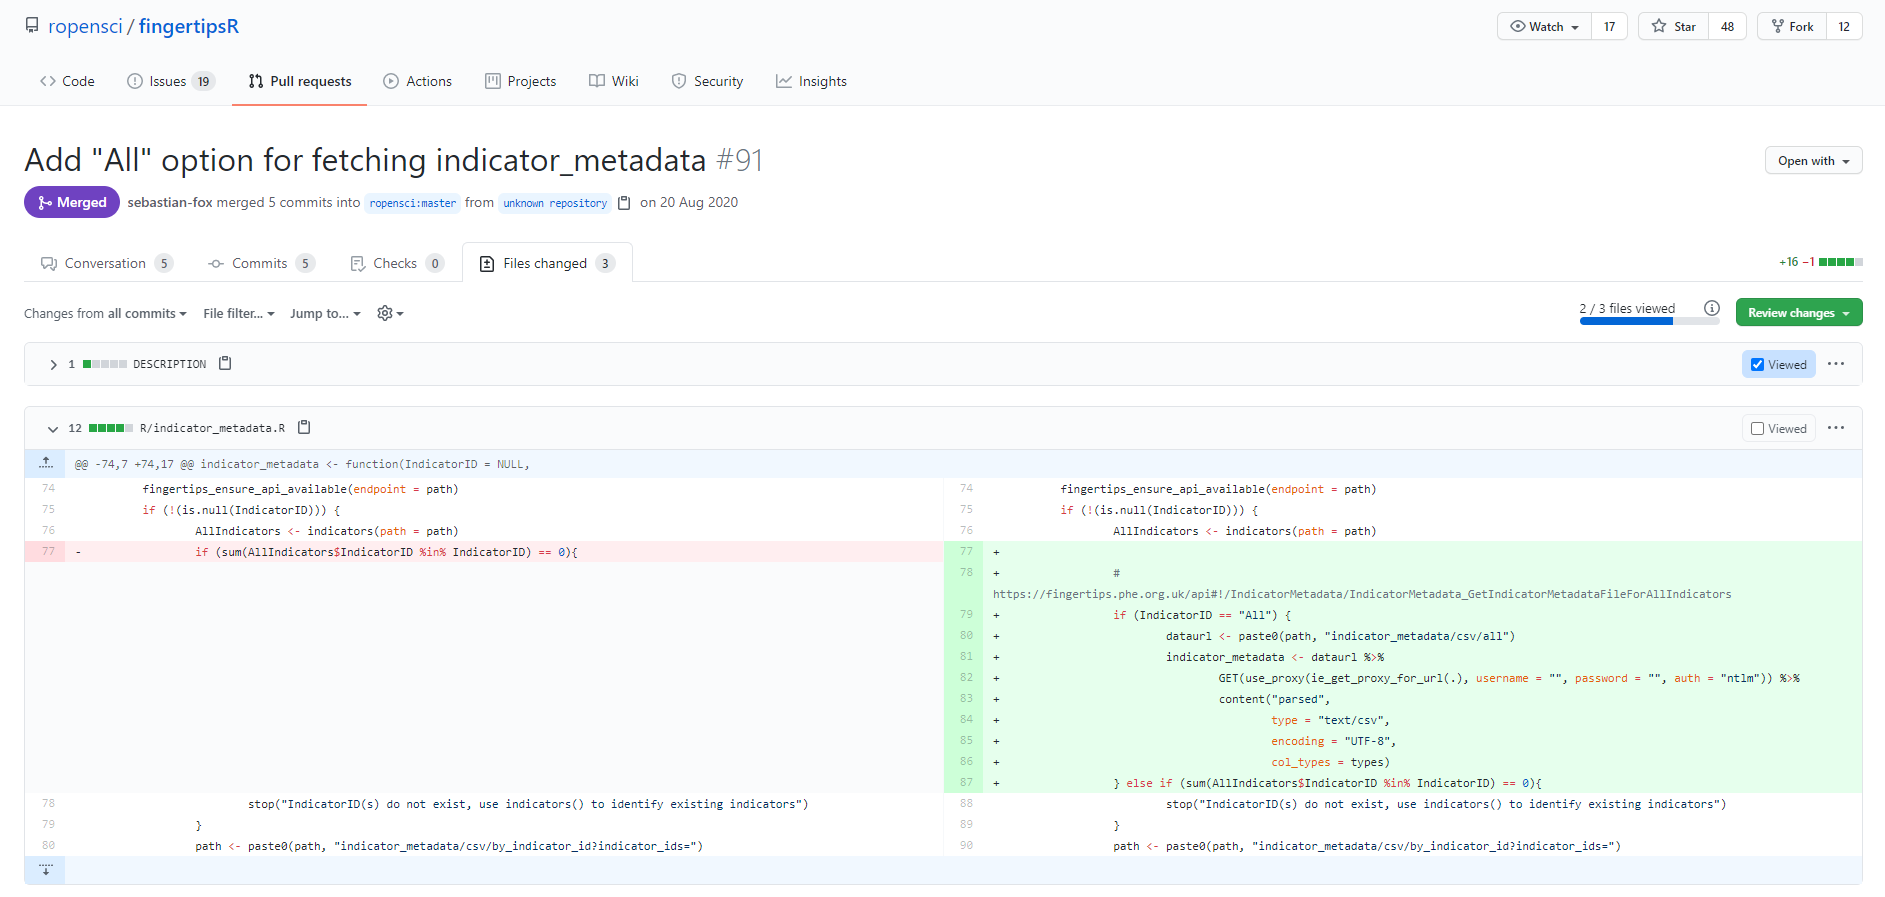
Fig. 12 Changes from an example Pull Request on the fingertipsR package.#
In the “Files changed” section of a PR (shown above), altered sections of files are shown before and after the changes were made, on the left and right respectively. Where changes have deleted lines of code, these lines are highlighted in red on the left panel. And changes that add lines of code to the file are shown on the right.
This highlighted summary of changes provides a useful interface for peer review. When carrying out a review using this view, you can add comments to specific lines of code and these comments can include suggested changes. All comments made using this view are also shown in the main Conversation view. When completing a review, a reviewer can indicate whether the PR should be merged or if additional changes are required.
Once a PR has been reviewed and the reviewer is happy with the changes, internal developers can use the Conversation view to merge the PR changes onto the target branch.
Note
The repository settings can be adjust to project branches against specific actions.
You should consider preventing merging onto the main branch without an approved Pull Request to enforce peer review.
You can combine this with a Pull Request template
to ensure that a standard peer review process is followed for all changes.
Fork a repository to maintain an independent copy#
Forking a repository takes a complete copy of a third-party project’s current state, including its history and all existing branches and tags. Any changes made to a fork do not affect the code on the original repo, and vice versa.
You might fork a repository when you want to:
Contribute to a project as an external collaborator
Make changes to a project for your own use, or to maintain a copy that is independent to the original
In the first case, lets consider an example where an issue describes a bug in a project’s code. Looking at the code, you think that you know where the source of the bug is. You create a fork of the project and clone your copy of the project locally. Here you make commits that include changes to fix the bug and test that these changes work. Once the bug is fixed, you create a Pull Request on the original project and describe how your changes fix the bug. The source branch of this PR will be the branch that you committed to on your fork of the project, while the target will be the development or main branch of the original repo.
In the second case, perhaps you want to reuse or adapt code from an existing project. If the changes that you wish to make to the code are not in line with the aim of the original project or the project is no longer actively maintained, then you might create a fork to contain these changes.
You should note that forks do not automatically synchronise with the original repo. This means that after you create a fork, changes to the original repo need to be manually synchronised if you want to include them in your repo. You should ensure that you synchronise your branch with any new changes before offering to contribute your changes to the original project (see Pull Requests).
See the GitHub documentation for instructions on forking a repo and keeping your fork up to date with a project and also working with forks.
Use GitHub Actions for continous integration#
Continuous Integration is discussed in more detail in Automating code quality assurance.
Other GitHub features#
Project boards offer project management features through a Kanban-style board. These boards can be used to track assignment and progress of specific tasks. Linking tasks to specific issues and pull requests aids the use of boards.
GitHub Pages offers hosting of static web content, which can be useful for code documentation. You can use GitHub Actions to generate this documentation from the code and deploy directly to the Pages site. Alternatively, project Wikis can be used to manually document your project using Markdown.