Guidance on Spark Sessions#
Usually when using Spark we are looking to process large amounts of data and so we connect to a cluster, this is known as cluster mode. An alternative is to use local mode, where Spark runs on a single machine such as a personal laptop. The examples in this book use local mode for simplicity and accessibility for others to run the code.
Architecture for cluster mode#
For detailed information about running Spark in cluster mode, please see the official documentation. If ONS staff are looking for more information online, note that our cluster runs on YARN.
Below is a simplified version of the architecture for a brief discussion on how a Spark session is set up. As always in this book, we assume the reader is using Python or R.
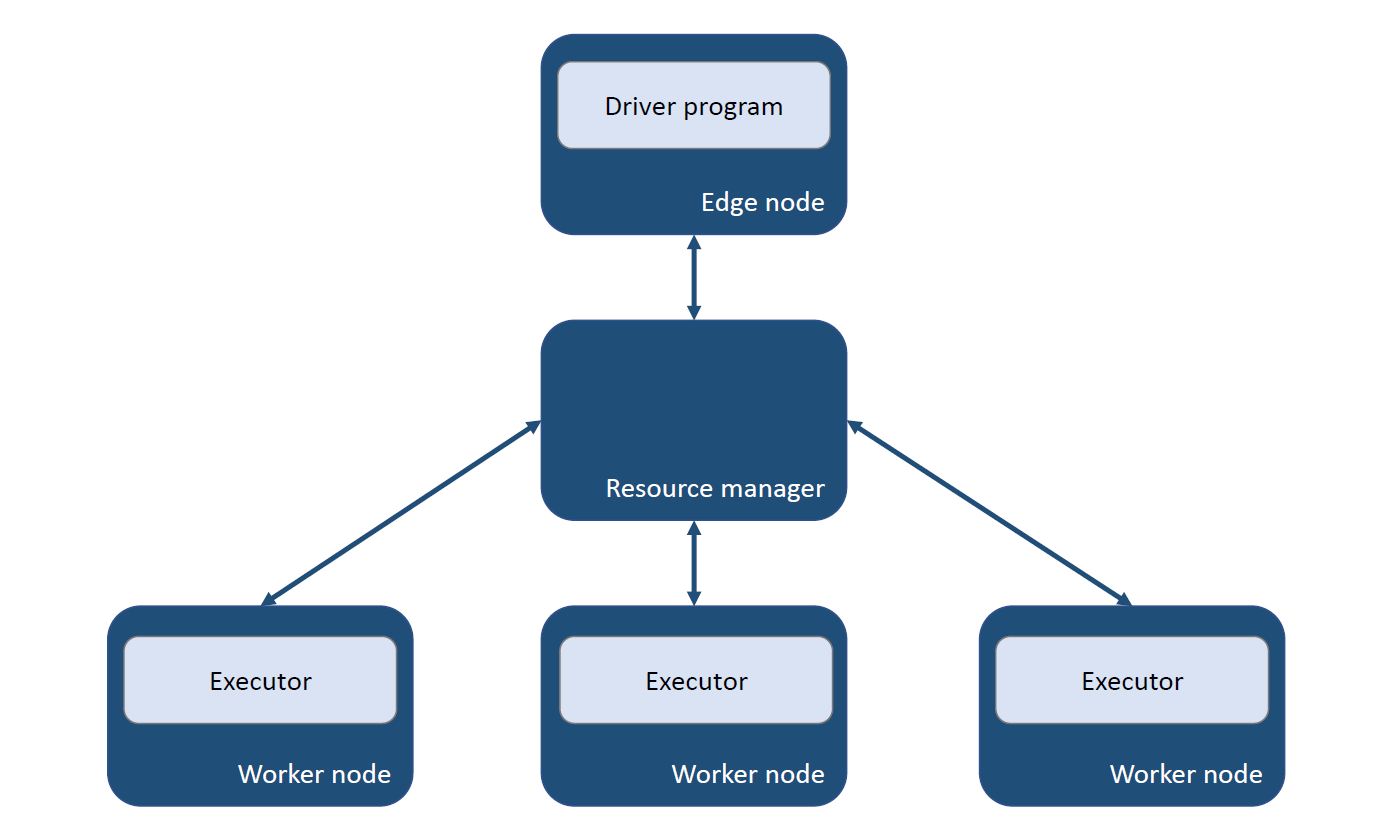
Fig. 1 Simplified Spark cluster running on YARN#
Each element in a cluster is referred to as a node. In a Spark cluster, the edge node is where the user interacts with the cluster through the driver program. There is also the aptly named resource manager within this architecture and some worker nodes where the processing of data happens.
Our first step is to launch a Python or R instance, which is the driver program running on the edge node.
Next from within the driver program we import the PySpark/sparklyr package then create a Spark session. Spark will communicate with the resource manager and allocate some resource to our Spark session in the form of executors.
We then write some Spark instructions in the driver to process some data. These instructions form Spark jobs which are executed by executors on worker nodes within the cluster.
Finally, any results we have requested are moved back to the edge node for us to view. Remember we cannot view data while it is on an executor.
One of the great features of Spark is that we are able to scale up our resources to complete more expensive tasks, such as processing lots of data or running some complex algorithm. When we send a complex Spark job to the cluster the resource manager will automatically allocate more executors to help with the job. It will also shut them down when they are not needed. This process of switching executors on and off is called dynamic allocation.
Creating a Spark Session#
There are many options when it comes to creating a Spark session. We recommend using the default parameters when getting started, you can then start adding other parameters when you learn more about how Spark works and how to tune your session to your specific needs.
Remember we should stop the Spark session when we are finished to free up the cluster resource for others. This is often done automatically when we stop our driver program, or you can also do it by running spark.stop()/spark_disconnect() in Python/R.
Using default parameters#
As a starting point you can create a Spark session with all the defaults, by leaving the optional properties blank in SparkSession.builder/spark_connect(). This is the bare minimum you need to create a Spark session and will work fine in most cases. Note you should give your session a sensible name, here we have called it default-session.
from pyspark.sql import SparkSession
spark = (
    SparkSession.builder.appName("default-session")
    .getOrCreate()
)
library(sparklyr)

default_config <- spark_config()

sc <- spark_connect(
    master = "yarn-client",
    app_name = "default-session",
    config = default_config)
Specifying configs#
When you have a good grasp of how Spark works, you understand what processing needs doing and most importantly you understand the data, you can look to introduce some customised configurations to your Spark session. You can do this using a spark-defaults.conf configuration file, or put the properties in the session builder, like this:
spark = (
    SparkSession.builder.appName("custom-session")
    .config("<property-name>", <property-value>)
    .getOrCreate()
)
config <- spark_config()
config$<property-name> <- <property-value>

sc <- spark_connect(
    master = "yarn-client",
    app_name = "custom-session",
    config = config)
Some of the most popular configs to set are listed and explained in the Config glossary section below. Some example Spark configurations are given in the Example Spark Sessions article.
See the page on Configuration Hierarchy and spark-defaults.conf for more details on setting these properties in other ways.
The Configuring Spark Connections page of the RStudio documentation gives a good introduction on this topic that builds on the guidance here.
Config Glossary#
Some commonly used Spark and YARN properties are listed in this section.
For more details look at the official documentation for Spark configuration
ONS runs Spark on YARN, that entails another set of configuration options documented here.
To view all of the parameters, both default and custom, associated with your Spark session use spark.sparkContext.getConf().getAll().
Note that sparkContext is created automatically when calling SparkSession
The values shown in brackets are common default values
App Name
.appName()
The Spark session is often referred to as a Spark application. This option gives your Spark session a meaningful name, which can be used to help others identify the purpose of your app.
You should enter your app name as a string, so within ‘single’ or “double” inverted commas.
Executor Memory
.config("spark.executor.memory", 1g)
This is the amount of memory per Spark executor. Can be given in mebibytes (m) or gibibytes (g).
Cores
.config("spark.executor.cores", 1)
This is the number of cores each executor can use.
Executor Memory Overhead
.config("spark.yarn.executor.memoryOverhead", max(0.1 * spark.executor.memory, 348m))
This sets the amount of additional memory allocated per executor for overheads.
The default value is either 0.1 times the executor memory size, or 348MiB, whichever is greater.
You might consider increasing the memory overhead, for example, if you are using User Defined Functions (UDFs) in your PySpark code.
Dynamic Allocation
.config("spark.dynamicAllocation.enabled", "true")
This setting allows your Spark session to scale up or down by automatically adding and removing executors depending on your workload.
In many Spark environments, dynamic allocation is enabled by default.
Max Executors
.config("spark.dynamicAllocation.maxExecutors", )
This sets the maximum number of executors that can be used in dynamic allocation. Spark has no default value for maxExecutors.
Also note when specifying this config, Spark will reserve the maxExecutors for you so others cannot access these resources until you stop your session- even if you don’t need them. See the reserving section of the calculations below for more details.
Shuffle Service
.config("spark.shuffle.service.enabled", "false")
This property helps with processes like switching executors off safely using dynamic allocation by making use of shuffle files. The default value of this property is false.
Hive Support
.enableHiveSupport()
This property is set by default and should be used if you want to interact with data stored in Hive tables.
Shuffle Partitions
.config("spark.sql.shuffle.partitions", 200)
Sets the number of partitions to use for a DataFrame after a shuffle. This is a key property to adjust depending on size of the DataFrame, e.g. see Ideas for Optimising Spark.
Console Progress Bars
.config("spark.ui.showConsoleProgress", "true")
Setting this property to False is a popular one for CDSW 1.6 where outputs are sometimes obscured by the progress bar in the console.
Calculating Resource Allocation#
Let’s take the large session from the Example Spark Sessions and explain the allocation of resource in more detail.
spark = (
    SparkSession.builder.appName("large-session")
    .config("spark.executor.memory", "10g")
    .config("spark.yarn.executor.memoryOverhead", "1g")
    .config("spark.executor.cores", 5)
    .config("spark.dynamicAllocation.enabled", "true")
    .config("spark.dynamicAllocation.maxExecutors", 5)
    .config("spark.ui.showConsoleProgress", "false")
    .enableHiveSupport()
    .getOrCreate()
)
Resource allocation#
When asking how much resource is allocated to this application?, we generally mean how many cores and memory is this application using?
Cores - We have requested 5 cores per executor using spark.executor.cores and 5 executors with spark.dynamicAllocation.maxExecutors. The sum is then:
5 cores per executor x 5 executors = 25 cores
Memory - Using spark.executor.memory we requested 10 GiB of memory per executor. Using spark.yarn.executor.memoryOverhead we
requested 1 GiB of overhead memory. As before, we requested 5 executors with spark.dynamicAllocation.maxExecutors. Now the sum is:
( 10 GiB + 1 GiB ) per executor x 5 executors = 55 GiB of memory
This does not mean we have the full 55 GiB available to process data. The topic of memory management in Spark applications is complex and beyond the scope of this book. Please see the official documentation for more information.
Reserving resource#
An important point to remember about setting the spark.dynamicAllocation.maxExecutors option is that although Spark will increase and decrease the number of executors
we use at any point, the maximum resource requested will be reserved for the application.
That means that in the above example Spark will reserve 25 cores and 55 GiB
of memory for this application for the entirety of its duration, no matter if we are only utilising a single executor. This is not an issue here as 25 cores and 55 GiB isn’t
excessive for processing a large DataFrame. However, if spark.dynamicAllocation.maxExecutors was set to 500 requests from other users on the same cluster might be rejected and the cluster
would be under significant strain.
Further Resources#
Spark at the ONS Articles:
PySpark Documentation:
sparklyr and tidyverse Documentation:
Spark Documentation: